Friday, December 16, 2022

Blocking the Torso: 3D Modeling Fundamentals


Blocking the Torso: 3D Modeling Fundamentals

When first sculpting a character in Zbrush, it’s important to start with blocking! Beginners can get intimidated by sculpting when they see professionals start their sculpts using highpoly shapes. The blocking method allows beginners to start with low resolution shapes and work their way up, adding more and more definition as you go. It's important to spend time getting things right during this beginning phase of building a character. Having an accurate foundation when you are in low resolution blocking mode will ensure that the character continues to be accurate as you add more definition.. 

In this lecture below taught by AnimSchool Instructor Christopher Wright, you'll notice he mainly uses the Move brush tool. Christopher keeps things simple but very precise, ensuring he's referencing the concept art along the way. Referencing the concept art as you go, ensures that you have the correct proportions for the unique character you're building. As Christopher discusses, because the geo is low resolution, moving verts is easy and fast. 

While in the blocking phase, it's also vital to rotate and look at the objects from different angles, making sure that it resembles a human torso from all sides. 


In this lecture taught by AnimSchool Instructor Christopher Wright, we learn about blocking the torso in a character model. Using mostly the Move brush, Christopher shows us the importance of starting simple, getting the proportions correct and adding more definition as you go. 


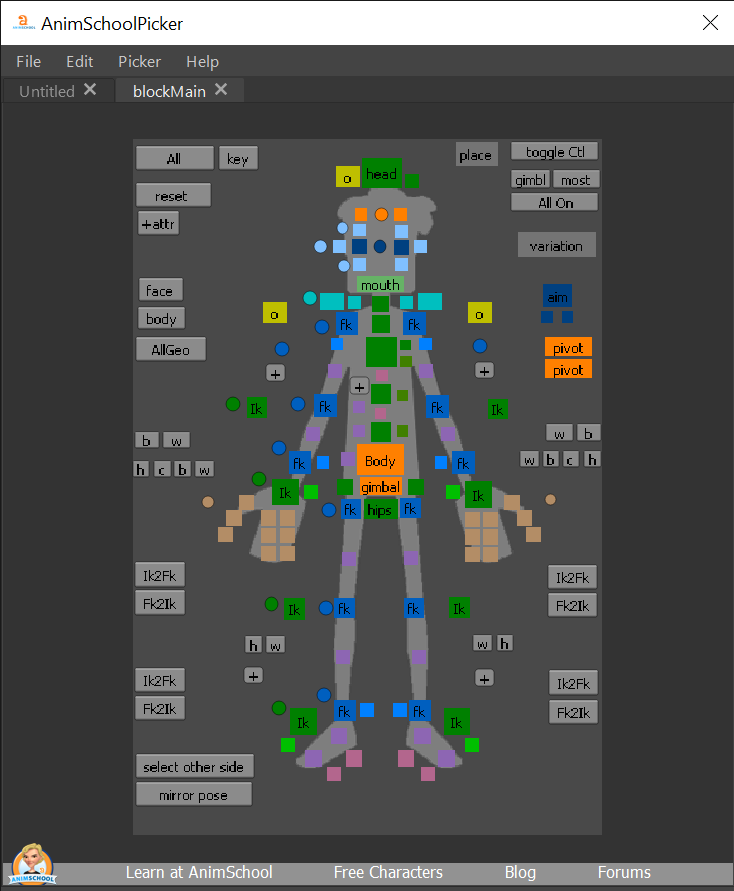
For an in depth analysis on setting up hierarchies in maya be sure to watch Christopher Wright’s full lecture 


Download AnimSchool's Feature Level Rig for Free and start animating today!

Start your 3D Animation Journey in our next 11-week term at animschool.edu


Wednesday, October 12, 2022

Autodesk Maya Tips: How to Practice Good Hierarchy


Why should you care about having good hierarchy and staying organized in 3D modeling?

Having good visuals can seem to be the most important part. If it looks good, why worry about what's going on in the back end, right?

Trouble is, a 3D asset is touched by man hands (and computers) in its route through the animation pipeline.

The first place to start is in naming. 

Naming

Naming can vary from modeler to modeler but has to follow some key rules. 

1. Names need to define the object 
2. Names need to be unique 

If there's 100 bolts on a robot, each bolt needs to have a unique name. This is where padding comes into play. 

Padding
Autodesk provides a great definition: Padded numbers are frame numbers that have a specified number of digits, where 0s are used to fill the unused digits

For example: Four digit padding is something like bolt_0003 or leaf_0010

Making sure names are easily readable is also important. This is where Camel Casing comes in. 

Camel Casing 
When there is more than two words to describe an object, lowercase the first letter of the first word and capitalize the first letter of the words proceeding the first. 

Example: pinkyFinger or largeRedBall

Once naming is complete, it's time for group. 

Select Edit > Group or press Ctrl + G

Groups can be made when thinking what objects need to move together like the neck and the head or the arm and the hands. 


Pivot Placement
Next task in setting up a good hierarchy is pivot placement. 
One must consider where objects rotate from. The feet rotate from the ankle area. 

Luis illustrates further why it's important to place the pivot in the right spot. 


For an in depth analysis on setting up hierarchies in maya be sure to watch Luis Labrador’s full lecture 


Download AnimSchool's Feature Level Rig for Free and start animating today!


Start your 3D Animation Journey in our next 11-week term at animschool.edu


Wednesday, August 31, 2022

Animating the Eye Dart


There is an old famous proverb “the eyes are the window into the soul” which simply means that a person’s eyes can betray what they are truly feeling at any given moment.


Our eyes, more than other parts of our body, make us feel “human”. As artists, they are the key to convincing the viewer that what we have created is real, emotional, and true. Eye animation is what takes an animated character from looking great to feeling real. Emotion and action begin in the eyes. When you turn your head, it is your eyes that lead the action. When you are disgusted and have to look away, it is your eyes that close first. Thought and feeling start with the eyes and then descend to the rest of the body. But how? How can you convey feelings and emotions through two small orbs of geometry? By understanding that eyes are not just seeing the world, but processing it. Take a moment and look at your eyes in the mirror. Do you see that? That small quick motion where your pupils travel across your eye and then darts to a new position. In animation, we call that an eye dart and it allows animators to quickly and simply convey that a character is truly alive. 


Animschool instructor Ricky Renna in his class on Facial Performance makes it a priority to understand, analyze and execute a successful eye dart. An eye dart is not a one size fits all idea but rather the speed and frequency of an eye dart can actually determine how a character is thinking. Are they frantic? Are they scared? Are they exhausted? Maybe they are about to fall asleep and so their eyes slowly dart through the air, unfocused and hazy as their brain starts to prepare itself for oblivion. Maybe your character is searching for an answer under perilous circumstances and so their eyes are quickly darting around,  searching for an answer just out of reach. If an eye dart expresses thought or action in a character, it can also be used to convey a lack of thought or control. Your character could be hypnotized, losing the ability for independent thought and so their eyes remain completely still and unblinking. An eye dart can be as complex as creating the illusion of a character attempting to perform rocket science but it can also be as simple as a technique to keep your character feeling “alive.”


But how can you animate an eye dart? 


Eye darts are a series of small movements within the eye happening constantly. On a technical level these darts average between 2-3 frames and about 80 percent of the movement in an eye dart will happen in just one frame with some small settle on the rest. A two to three-frame eye dart creates a nice crisp movement to patch back into the rest of your animation. But an eye dart doesn't just affect the geometry of the eyeball itself, it impacts and influences the flesh around it, or in this case the eyelids. To really give the impression of a character that is fleshy and real, after completing a full pass on eye darts, go back in and ever so subtly have the eyelid motion follow the eye. If your character’s eyes dart down, the eyelids should subtly follow that motion soon after. Keep in mind that animation is a tool to mimic real life and so since in real life your top lid would move more than your lower lid, use that in your animation. By taking the time to execute a  thoughtful and intentional eye pass, your animation can transform from “student level” to industry professional level work. 


For an in depth analysis of eye darts and eye animation on feature level scene be sure to watch Ricky’s full lecture 


Download AnimSchool's Feature Level Rig for Free and start animating today!


Start your 3D Animation Journey in our next 11-week term at animschool.edu


Friday, July 29, 2022

How to Avoid "Spline Depression"


Every animator is different and every workflow is different - but there is something we can all agree on, hitting spline for the first time can be ROUGH. 


It's hard to see an animation that has been posed and blocked in so beautifully get destroyed by a computer. Suddenly your timing feels slow, your emotions flat and you fall into a “Spline Depression.”


Spline and Polish can be time-consuming and frustrating. Sometimes it can be hard to push through this ugly phase. For animators who work from stepped to spline, turning your curves into vectors for the first time rarely looks the way you planned in your head. But know that it will get better! Once you train yourself to see the small fixable details instead of the big floaty moments, you will be able to tackle your shot piece by piece and uncover the integrity of your work. 


Simple tips for entering Spline:


When you start to spline, make sure to break your shot into manageable chunks. You can do this by breaking your shot into small amounts of frames, or by focusing on one small piece of the body at a time. No matter which method you choose, remember that all movement starts from the root, and by defining the movement of the root first you will avoid counter-animating down the line. 


No matter where you are in your spline process, don't forget the power of the arc tracker. Animation is all about creating fluid lines of movement, and by tracking your arcs throughout your animation, you will be able to quickly find and fix both timing and spacing. This can be done by using a built-in tool in Maya such as Animbot’s Motion Trail,  but if that's not for you, you can even track your arcs with an expo marker on your screen. 


It's easy when hitting spline to allow the computer to take over and to make choices for you as an artist. Don't let that happen! Trust your eye as an artist and make sure that your character is moving the way YOU chose it to, and not the way the computer interpreted. 


This might be the hardest tip of all, It's okay to delete keys! Not only is it okay, but sometimes it can be necessary. If something doesn't look right, and you cannot figure out why, delete your keys and see where things are going wrong. It may seem destructive at the moment but it will save you time and effort down the line. 


Lastly, make sure to actually look at your graph editor after you hit spline. Sometimes the computer will take your keys and create curves that you never intended to create. By using your eyes and utilizing tools like auto and linear tangents, you can quickly find areas of concern and adjust your keys to create smooth motions. 


For more animation tips, watch our video below where AnimSchool instructor Martin Scotto explains in depth the 6 tricks he uses to avoid losing momentum when entering the Spline phase.


Download AnimSchool's Feature Level Rig for Free and start animating today!


Start your 3D Animation Journey in our next 11-week term at animschool.edu

Wednesday, March 16, 2022

It's time to walk the dog - How to Animate a Quadruped


AnimSchool Tips: How to Animate a Quadruped

It's time to walk the dog…or at least the quadruped. Let's be honest, learning how to animate a human on two legs walking is scary, much less a creature on four legs! So how do you break a quadruped walk down so that it's approachable? Well luckily, quadrupeds aren't that different from bipedal or human characters. Essentially a simple dog walk cycle is just two bipedal characters walking slightly offset from each other. Sound confusing? Animschool Instructor & Professional Animator, Daniel Paul, is here to “walk” us through the doggie steps.

Become an Animator Online in our next 11-week term at AnimSchool

Friday, February 18, 2022

When Should I Start Animating With Advanced 3D Character Rigs?


Animschool instructor Jean-Luc Delhougne gives us a key tip - give yourself time & space to explore & play with a new character rig before jumping into the animation portion


It’s finally the day - you have worked hard for this. You cannot hold back your excitement. You. Are. Ready! It's your first time working with an advanced feature-level 3D character rig, which can be both exciting and intimidating.


One mistake students and even professionals make when working with a new rig is to believe that an advanced rig will make anything you animate look feature film ready. But animation is not about the rig, it's about the animator.


What is the biggest difference between a simple rig & an advanced rig?


An advanced rig functions much like a simple rig but with a few more detailed controllers. All the most important features and mechanics of an advanced rig can be found in a simple rig. If you look at the Animschool catalog of characters and rigs, one of the most popular simple rigs is a little fellow we call “Blocky.” Blocky has been used in shots as simple as taking a step, to scenes as complicated as dentists extracting a tooth from a patient. He is emotive, flexible, appealing, and most importantly easy to use. So what is it about blocky that makes him so much more approachable to start with than our Marina rig? It really boils down to one word, overthinking.


Here is a screenshot of Blocky’s picker and next to it a screenshot of Marina’s picker:

AnimSchool Pickers


At first glance, Marina’s picker looks way more complicated than Blocky’s, but when you look closer you can see that the foundations, they are not that different. Both radiate from a central body node, both have three major spine controllers, both have IK/FK arms and legs and both have one central head controller. When students see an advanced rig for the first time they often think that they need to use EVERY SINGLE CONTROL. In reality, nothing could be further from the truth. All the additional controls that are added from a simple rig to an advanced rig are mostly for finesse work and facial emotion. The basic mechanics are the same.


AnimSchool's Simple Rig "Blocky" & Advanced Rig "Marina"

At Animschool you are placed in a curriculum that strategically prepares you to animate with more advanced rigs. By the time you interact with an advanced rig, it is because you have proven that you are able to demonstrate the 12 principles of animation with a simple rig. Only then will you be granted access to the advanced rigs. This isn't because you are suddenly expected to use every new controller, but rather because you have proven that you know how to utilize the major controls. These major controls will be in almost every rig you interact with for the rest of your career, and if all else fails - remember the bouncing ball. If you can animate a fully thought out, entertaining scene with just a bouncing ball, how many controllers do you really need to animate a compelling scene with an advanced rig? The answer is not many, so start simple and don’t overthink.


Remember when interacting with a new rig, simple or advanced, to give yourself a break, and have some fun with it. Instead of jumping into your shot and believing it will be a masterpiece from the beginning, spend a day and play around. Set up a few pushed poses or do a facial study. Treat learning a new rig like an improv class. Put a few ideas in a bowl, pull one out and give yourself 15 minutes to set your new rig up according to whatever it says on the piece of paper. This is a great way for you to get to know your rig. It enables you to gain a certain level of familiarity and comfort between you and the computer. As you do this exercise, remember, this isn't for a shot, and it isn't for an assignment, it's just for you. So take the opportunity and have fun!


If you and a friend are learning a new rig together you can challenge each other to create the most ridiculous scenarios and then compete. Only after you have spent some time getting to know your rig should you then jump into actually animating for real.


Download AnimSchool's Feature Level Rig for Free and start animating today!


Start your 3D Animation Journey in our next 11-week term at animschool.edu