Friday, December 7, 2018

New AnimSchool VFX Character: Towerback


AnimSchool's new VFX Creature Animation class uses our new detailed creature rigs.

"Towerback" is our new VFX character. He's taller than a building and shakes the earth when he moves. These creatures are eager to wreak havoc and create mayhem in the cityscapes we provide.

Our students use Towerback in our new VFX Creature Animation class, integrated with our custom HDRI background plates. To apply to be a student at AnimSchool go to www.animschool.com.

Towerback was designed by artist Yishu Ci and modeled by AnimSchool founder Dave Gallagher, and textured by AnimSchool alum Paul Bellozas.

Come join our VFX and other animation classes to learn with AnimSchool rigs!

Friday, November 30, 2018

Acting Resources for Animators


Good acting is key to creating a believable, appealing performance. But, figuring out acting beats can be one of the most difficult steps in the process of animating a shot. It can be hard to figure out where to start, especially if you’re new to acting - don’t worry, many animators go through the same struggles when planning out their shots. Here are some resources recommended by our instructors to give you a better understanding of the foundations and subtleties of acting. 


Books


A renowned actor and teacher of theater in Russia, Stanislavski was known for his system of actor training, preparation, and rehearsal technique. An Actor Prepares delves into the exercises and techniques he would practice as an actor, and many of the concepts outlined (such as the “magic if” and method acting) are now considered standard practice in modern acting.


Uta Hagen - Respect for Acting

Starting out with several respectable roles on Broadway, Uta Hagen turned to teaching after being unofficially blacklisted from Hollywood for being suspected of harboring sympathies with the Communist party. She ended up mentoring several classes of actors and actresses, including some well-known stars like Al Pacino and Robert De Niro. Hagen’s beliefs on acting are that actions - what you do or say - are the most important. Respect for Acting is an account of Hagen’s own struggles with acting, and includes several examples and instructions for practice.


Ed Hooks - Acting for Animators

A professional actor and acting coach, Ed Hooks is best known for pioneering acting training for animators. Acting for Animators goes over acting principles and uses basic acting theory to explain concepts like character movement and facial expressions.


Paul Ekman - Emotions Revealed / Telling Lies

Facial expressions are essential for almost any acting shot, and Dr. Paul Ekman is one of the world’s leading experts on facial expressions - specifically micro expressions. His famous books Emotions Revealed and Telling Lies reveal many of the findings of his research on microexpressions and how to spot them. Animators could find it useful to incorporate some micro expressions into their shots to help convey subtext.


Videos


Michael Caine - Acting in Film

This is a recording of an old instructional session by Michael Caine on the topic of Acting in Film. Caine discusses some helpful tips and teachings for better acting that still remain relevant today, such as not overacting, especially in close-up shots, and understanding the character’s backstory. He also goes through some scenes with a few actors, giving feedback and revealing some lessons he’s learned through his experiences. This is a great video to learn more about what goes on behind the scenes and to understand how to translate an idea of a character into a convincing performance with direction from one of the greats.


Nerdwriter - Westworld: What Makes Anthony Hopkins Great

Nerdwriter is a Youtube channel that specializes in analyzing and explaining pop culture. One especially popular video they created is an acting analysis of Anthony Hopkins’ character on the show Westworld. The video goes over the context of the scene as well as the subtext of the acting, going into intriguing details of Hopkins’ delivery of his lines and his microexpressions. The performance analyzed in this video is a great example of acting with many dimensions and provides a good standard for acting with depth.


Hopefully, these acting resources will prove as helpful to you as they do to our instructors and students. If you have a favorite book or video not listed here, please share it with us in the comments!


Looking for the best 3D Animation schools? For more information about AnimSchool and our online animation programs, visit us at www.animschool.com


Friday, November 9, 2018

Graduate Spotlight: Nagu Moreno


Nagu Moreno is one of our very talented graduates from animation program. Throughout his time at AnimSchool, he won the hearts of his instructors through sheer dedication and hard work. We recently got a chance to interview him for our blog and learn more about him, and his workflow.

Tell us about yourself and your background.

Nagu imitating the work of Quirino Cristiani: a local animator
I was born in Buenos Aires, Argentina, I work and live here. For as long as I can remember I was passionate about animation. It may be not a very original story but the truth is that as a child I always said, I wanted to make cartoons when I grew up. I was fascinated by all cartoons, but my favorite was The Pink Panther Show. I spent hours drawing the characters so much that my mom enrolled me in a drawing class. I also enjoyed acting and everyone knew me for making impressions of imaginary characters or our school teachers. Later I studied acting, theater and performance for a couple of years. After I finished high school, I was a bit shy and somewhat confused and ended up studying Marine Biology for some time - I love animals, especially the weird ones, but I’m not so good at STEM subjects. Later because of my interest in movies I studied towards a degree in Sound and Image Design in University of Buenos Aires (UBA), getting closer to animation although I didn’t realize it then. I love all kinds of animation, all techniques and styles.
In my free time, besides animation, I enjoy playing football and traveling when possible.


So what motivated you to become an animator?


I first discovered 3D as an animation technique when I was in college. I remember leaving the cinema after watching Monsters, Inc. absolutely fascinated. I realized that this was what I wanted to do, so I quit my job at the supermarket and with just enough money enrolled in a intensive course at a private university which focused on all areas of the 3D world, all the while studying in college. I saw it as a self-investment and a chance to work on something I enjoy. Although in my country animation schools are few and far between and the industry has a long way to go, the course served as a great introduction to the industry, and I soon started working as a 3D generalist for movies and advertising companies in various local production studios.

From the beginning, I was most of all interested in animating characters – to make each gesture and expression come alive to me means everything I love about this world, which is why I decided to focus on Character Animation.

What made you choose AnimSchool?


AnimSchool's Marina Character design
I learned a lot about the production workflow of a full-length animated movie while working in Underdogs, a movie which was partly made in my country, but not so much about character animation due to the position I was working in.

I remember stumbling upon AnimSchool showcases and loving the students’ work and the rigs; the characters looked very expressive and versatile, but enrolling seemed impossible because of time and cost. I learned more about AnimSchool from my coworker Maximiliano, who was a student here. It made me happy to know that my wish to become a better animator and learn from the best animators in the industry had a name and a place and was something real and approachable.

Tell us about your workflow.


While choosing an audio I try to visualize possible camera angles and framing. I believe that although my dialogue shot begins and ends in a specific time frame, the story must continue before and after the shot. So it should not be a stand-alone but rather part of a bigger story arc and my shot is able to convey that feeling. Therefore it is very important for me to choose those settings and elements that would help the viewer to quickly figure out what is happening and where the shot is leading to.

My pre-planning involves drawing thumbnails. I like acting the scenes out in front of the mirror. After getting a general idea of the acting, I film a reference, trying to identify the key moments and poses which are crucial for telling the story.

Click for bigger view
With several video references filmed, I piece parts of them together to make a final version. As I tend to exaggerate the acting or the number of poses, which may have something to do with me being a Latin American with Italian roots, I always watch out for it and try to tone down and simplify the final version.
Then I draw some quick frames with key poses and extremes and turn them into a sequence with a timeline in an editing program. Now I have an animatic which helps me to check quickly if the timing of my animation is right and to make the poses clearer.

Time to start working in 3D – I first work on the key poses, mainly the body - I don’t touch the face, just some quick expressions so it doesn’t look too neutral. I try to get as many body mechanics references from my video as I can and adapt them to the character’s weight and physical aptitudes. I start working with curves in step mode as I feel more comfortable with pure blocking. The master poses finished, I work on the extremes and add breakdowns, going from bigger to smaller and trying to make the pose to pose changes look natural, so I work on the ease-ins and ease-outs, movement arcs and adding facial expressions little by little.
When I’m happy with my body/facial blocking and I feel that it flows naturally without spacing jumps and the timing is right, I start animating the lip sync and blinking with spline curves. After that I add little details I see in my references I may have not noticed before, which may be help the character come to life, like a sigh or an eye dart. I like to consult others’ opinion while working, not necessarily someone who knows about animation. It helps me see if my idea is clear to others, or work out a gesture or in general have a new and different perspective. Then I pass the animation to spline and start polishing the curves and retouching everything to recover the beats I had in my blocking which now may look a bit too smooth. While in blocking I work mainly on the timeline from start to end, here I polish the curves in chunks, dividing the animation in about three parts. I work on general controls hierarchy first, moving on to the details, generally hips, then torso,  neck and head and the limbs, etc.

Were you working before joining AnimSchool? And now that you have graduated from the animation program, what are your plans?

I have mainly worked in audiovisual studios here in Argentina and although I have worked in full length films, mostly locally, the bulk of my experience is as a 3D generalist in commercials. As a generalist I realized I cannot improve my skills if I have to work on every step of the project (modelling, lighting, etc.), especially with timing and resources available when making a commercial. My first step was to focus on character animation and make a leap in quality I felt I badly needed. At the moment my end plan is to be able to work on high quality fully animated movies, while continuing with my studies, learning and improving my skills.

What is the animation industry like in Argentina? Do you think it has the potential to grow?

Argentina’s animation industry is mainly dedicated to advertising. There are a number of studios that specialize in commercials that produce a decent quality content.
Argentina has a humble but significant place in the history of world animation since the beginning of the 20th century. However, attempts in animation here have always been isolated and independent, often without a definite idea of a long-term project.
That said, in my opinion it’s witnessing a rise, there is a new generation of professional animators, who can learn quickly thanks to how easily you can access information and technology these days. The only thing needed is more options in professional education and most of all structured degrees in animation as a separate discipline, independent of a degree in cinema.

What would your advice be for the aspiring animators?

Use everything AnimSchool has to offer - general reviews, art classes, etc. For me personally it was very useful asking for feedback and even having reviews with my classmates who could offer a fresher outside perspective. At the same time, all my instructors were very open to communication and questioning, and were always ready to share their workflow, which was extremely helpful.
In my opinion the result is worth the effort, the same way a shot may look vague in the beginning and then takes form with every key pose until eventually coming to life. This is what happens at the end of the program: you realize how much you have learned, and although you can always improve, the knowledge you have is already yours and stays with you forever.

Thank you Nagu for your time and the interview.


Thursday, November 8, 2018

New AnimSchool Character Rig: Marina


AnimSchool Student Dayanna Rodriguez
Marina is AnimSchool's charming new character rig.

Marina's 2nd set of clothes are in development. She'll have two complete outfit changes and two hairstyles to choose from. Students can mix and match the shirts, pants, shoes, jacket, as well as hair to get a unique look.

AnimSchool's new character Marina is already a favorite among our animation students. Our students use Marina in our feature animation classes 5-7.

AnimSchool Student James Blackmer
Check out these images from AnimSchool students using Marina already this term: Dayanna Rodriguez, James Blackmer, Tushar Bharti, and Marion Duvert.

You can see some of their works-in-progress on our Facebook page here: https://www.facebook.com/AnimSchool/


AnimSchool Student Tushar Bharti
Marina was crafted over months to ensure appeal and versatility, with greater support for hard deformations. Marina continues a new initiative at AnimSchool, using detailed texturing, like our new Marco rig.

Marina looks great in Maya's viewport too, taking advantage of Maya's Viewport 2.0 stingray materials display.

Marina was designed by Borja Montoro at Sergio Pablos Animation and modeled by Nina Tarasova and Dave Gallagher, textured by Nina Tarasova, and rigged by AnimSchool founder Dave Gallagher.


AnimSchool student Marion Duvert
The designer for this character is Borja Montoro at Sergio Pablos Animation Studios. Sergio previously allowed AnimSchool to use the design for his Giacomo character in 2015. Now AnimSchool is authorized to use the Marina design for our animation students.

Last CTN Expo, Sergio Pablos saw AnimSchool's animation Showcase and said AnimSchool is pushing the boundaries and he loves our students' work!

Come join all the students learning online at AnimSchool: http://www.animschool.com


Friday, October 26, 2018

AnimSchool Partner: AnimationWorkshops.com designed for Teens

AnimationWorkshops.com
Live Animation Classes for Teens 13-18

AnimSchool partner AnimationWorkshops started this month!

AnimationWorkshops offers 11-week live online classes for teenagers 13-18 or older. There teens can explore 3D animation for fun or to see if it might be a good career option.

For those wanting to attend AnimSchool but too young for a post-secondary school, contact
AnimationWorkshops to see if it's right for you.

Take a look at the website, call 435 239-5160 or chat today!

AnimationWorkshops is a separate site so to get updates, sign up to get more information here!

www.animationworkshops.com offers 11 week courses. You meet live online with the instructors two times per week (for most classes), one session for instruction and one for reviewing each students work in turn.

If you can't be there live for a class, you can watch the recordings of the classes.


AnimationWorkshops licenses AnimSchool's famous rigs and web technology so you know it will be a quality experience.

If you want to explore future career possibilities in animation, this might be the opportunity. Are you excited about animated movies or shows?

Do you want to find out if you'd like to help make them?

Do you like games and want to see if you'd enjoy MAKING them instead of just playing them?

The first term begins this month. Register for a class! Come see the instructors and the times the classes are offered here. Visit www.animationworkshops.com.

Wednesday, October 10, 2018

Everything is a Bouncing Ball


    Ever heard of the saying, “Everything is a bouncing ball”? This is a well-known concept in animation, and it essentially means that just about everything relies on the same animation principles of timing, spacing, arc, etc. that are applied to something as simple as a bouncing ball. There’s a reason why just about every animation curriculum starts out with a bouncing ball exercise - through it, you can learn the foundations of all animation. Animating characters or creatures can be quite a daunting task, so it could help to take a step back and approach each part of a complex rig as just a bouncing ball. (Instructor Tony Mecca did just this in his VFX demo here)

    It can be difficult to visualize how a character with multiple limbs and joints could amount to a collection of bouncing balls, so our instructor Yuri Lementy did an analysis of a few shots to help visualize the bouncing balls hidden in some of our favorite animations. You can use the concept of bouncing balls to plan out the overall hip movement of a shot, or even to dictate the bouncy motion of a character’s hands and feet. The possibilities are endless! Check out the magic in play here:


Looking for the best 3D Animation schools? For more information about AnimSchool and our online animation programs, visit us at www.animschool.com

Thursday, September 20, 2018

The Basics of Bangin' Brows


    The eye mask is an immensely important part of any kind of acting animation, and it’s an area which requires much time and attention to detail. Principles of animation apply not just to the body, but to the eyelids and eyebrows as well. Utilizing these animation principles well will allow you to shape your way to more expressive and appealing brows. A few of these ideas include:  


Arcs - Track the motion path of the brows to make sure that they travel in arcs rather than linears
Offset - Offsetting the movement of one brow can make it look as though the other one is pulling it up/down and add variety to the brow motion
Lead/Drag - Offset the brows from the eyelids to make the brows either lead the eyelids or be pushed/dragged by the eyelids. One or the other could look better depending on the context of the action or beat.
Overshoot - Especially in the case with large, exaggerated motions, the brows can overshoot their final positions and then take a few frames to settle to give the illusion that the muscles underneath are settling into place.
Connectivity - Everything in the face is connected, so when the eyelids move, so do the brows, and vice versa. This applies to blinks, eye darts, expression changes, etc.
Framing the Face - Good posing in the brows will help direct the attention and frame the face. Brows are often used to help open up the face to one side or the other, and tend to support the direction of the eye gaze.


    To help drive these points home, instructor Greg Rizzi animated some quick examples on AnimSchool’s Marnie rig. See the principles of animation for brows in play in this super informative and helpful video:


Looking for the best 3D Animation schools? For more information about AnimSchool and our online animation programs, visit us at www.animschool.com

Monday, August 27, 2018

Parenting? Constraints? Choose Wisely.


    If you've ever animated a shot with props in it, chances are you’ve had some difficult encounters with constraints. Just creating a parent constraint often doesn’t meet the needs of a shot, and it can be confusing to try to figure out how to animate the prop correctly. Parenting is another way of creating a relationship between two objects, and can be quite effective if done properly. So, should you use parenting? Constraints? One of the best ways to deal with props is actually to use both.  

Parenting: Parenting refers to putting an object (the “child”) directly under the hierarchy of another object (the “parent”). The child follows the parent, but can also be moved independently of the parent. This hierarchy cannot be toggled on and off.


Parent Constraint : A relationship between a parent object and child object. The parent object dictates the movement of the child object, and the child object cannot be moved independently of the parent. The relationship can be toggled on and off.


   By parenting a child object to a locator, then parent constraining that locator to the parent object, you can create a degree of separation between the parent object and the child object. This way, you have a parent constraint which you can toggle on and off as needed, and the child object can still be moved and animated independently of the parent object.


    If you're new to parenting and constraints or just need a refresher, check out this clip from our Body Mechanics class, where instructor Charles Larrieu covers parenting, parent constraints, and using locators to gain more control over the constrained object.


Looking for the best 3D Animation schools? For more information about AnimSchool and our online animation programs, visit us at www.animschool.com 

Wednesday, August 8, 2018

New Character Rig: Marco 2.0!


Marco is AnimSchool's new pretty-boy character rig. He has two complete outfit changes and two hairstyles to choose from. Students can mix and match the shirt, pants, shoes, as well as hair to get a unique look.

AnimSchool's new character Marco is a new favorite among our animation students. Our students use Marco in our feature animation classes 5-7.

Marco was carefully crafted over a long period to ensure appeal and versatility.

Marco represents a new initiative at AnimSchool, using detailed texturing, while still maintaining a simple look. Marco looks great in Maya's viewport too, taking advantage of Maya's Viewport 2.0 stingray materials display.

Marco was designed by artist David Lojaya and modeled by Dave Gallagher, Jacob Van Valkenburg and Paul Bellozas, rigged by Dave Gallagher, and textured by and Paul Bellozas.

See when the class is offered here: https://www.animschool.com/ClassListing.aspx


To apply to be a student at AnimSchool go to www.animschool.com.
Come join our animation classes to learn with AnimSchool rigs!


New AnimSchool VFX Character: Grave


AnimSchool's new VFX Creature Animation class uses our new detailed creature rigs.
"Grave" is our new lizard character. If you could combine a lizard, crocodile, velociraptor, and dragon, you might get something like our new creature rig, Grave. These creatures are eager to wreak havoc and create mayhem in the cityscape provided.

Our students use Grave in our new VFX Creature Animation class, integrated with our custom HDRI background plates. To apply to be a student at AnimSchool go to www.animschool.com.

Grave was designed by artist Jong Lee and modeled by Dave Gallagher, and textured by Dave Gallagher and Paul Bellozas.

See when the class is offered here: https://www.animschool.com/ClassListing.aspx

Come join our VFX and other animation classes to learn with AnimSchool rigs!

Sunday, August 5, 2018

Pushing Poses Through Iteration


    There are so many animation principles to keep track of when creating poses - line of action, silhouette, appeal, and contrast, to name a few. The first pose you create is almost never your best, so here are some techniques that many professional animators use to take their poses to the next level. You can use these along with others as a great way to help train your eye to both see and create better poses.  


(Preston Blair on Line of Action)


  • Purpose: What's the drive and intention of the character? What emotions does your character have? What are they trying to express? Where is their focus and their energy? 
  • Line of Action: Push your main line of action to reflect the story behind the character at that frame, whether opening them up to one side or the other, or hunching away. Follow the line through the body, and see if you can extend the line of action through the limbs and other extremities.
  • Silhouette: Make sure you have a clear pose even in silhouette. Can you get rid of or make use of negative space?
  • Appeal: Is your character’s personality showing in the pose? Is the pose engaging and interesting to look at?
  • Contrast: Make use of different shapes and angles to add interest to your poses. Think of what your character is doing before and after that pose - can you exaggerate certain parts of the body to accent a motion, or play with squash and stretch to contrast a previous or upcoming movement?
  • Iteration: Keep pushing your poses until you end up with something a little more appealing. Don’t worry if you don’t see much change or improvement right away, or if you’re concerned about pushing things too far. It’s an iterative process, and as instructor Thom Roberts mentions in the demo clip below, you can’t judge your progress or determine whether you’ve gone too far until you can compare with what you had before. Make sure to occasionally flip between your old pose and new poses to compare and make decisions about what parts look better. 


    In the clip below, you’ll be able to see Thom’s process for iterating on a pose. Watch as he takes into consideration the purpose of the shot to shape the character, little by little, into a pose with more appeal.  


Looking for the best 3D Animation schools? For more information about AnimSchool and our online animation programs, visit us at www.animschool.com  

Monday, July 16, 2018

Hand Posing 101


(Hand poses drawn by Milt Kahl)


    When creating poses, some of the most overlooked yet important parts of the body are the hands. Hands can reveal a great deal about your character, but many beginning animators tend to leave the hands in flat, default poses. Even a neutral hand pose should adhere to the principles of good posing, such as readability and appeal. Hands can help accentuate a movement or action, and bring life into a gesture. Hands and fingers call follow a path of motion, reinforcing the path and strengthening the impression of a quick movement.


(Model sheet for the Disney animated film, Tarzan)


    Some ideas to keep in mind when posing hands are spacing and grouping. The fingers should be in harmony, and create appealing shapes with strong, interesting silhouettes. It’s preferable to avoid even spacing and parallel fingers. You can create interesting groupings, and play around with pushing one or more of the fingers to set them apart from the others. It also helps to utilize the arches and curls in the fingers, and to pay attention to the splay of the fingers in relation to each other. Don’t forget that fingers also have 3 axes of rotation!

(Hand references for Hogarth from the Warner Bros animated film, The Iron Giant)


    It can be difficult to effectively pose hands with all the different controls you need to keep in mind. In this clip, instructor Thom Roberts goes through his process of posing simple hand poses and gives us some helpful tips, such as rotating in the palm for a more relaxed and natural look to the hand, focusing on the first two joints of the fingers, and achieving visual interest by pulling out one or more fingers.   


Looking for the best 3D Animation schools? For more information about AnimSchool and our online animation programs, visit us at www.animschool.com

Tuesday, June 26, 2018

How to Caricature the Face to Create Appealing Poses


    As animators, we have the ability to push characters past the bounds of reality, and this is often what makes animation so appealing to watch. Though it can be very helpful to reference real life when animating, exaggerating and caricaturing those references can result in something with more life and appeal - especially when posing the face. Caricaturing the face can lead to cleaner mouth shapes and eye shapes, which make the expressions easier to read, and can help introduce some more personality into the face.


(created by Nico Marlet for the Dreamworks film How To Train Your Dragon)


    Character expression sheets for animated movies provide some great examples of how shapes can be simplified and pushed to create appealing expressions. Translating those into 3D comes with its own restrictions, but it's not uncommon for animators to "cheat" the facial controls into unrealistic positions to achieve the looks they want.


    To help illustrate this concept, take a look at this clip of Hans Dastrup, an instructor for our Facial Performance class. He shows us how to push a normal facial expression from a reference into something more appealing and suited to stylized characters, and talks about some tips for posing the face in 3D.


Looking for the best 3D Animation schools? For more information about AnimSchool and our online animation programs, visit us at www.animschool.com


Friday, June 22, 2018

Lecture- Animating Pupils

In this clip, AnimSchool instructor Luke Randall discusses how to animate a character's pupils to make them appear more alive and getting the maximum effect out of an eye animation.


Looking for the best 3D Animation schools? For more information about AnimSchool and our online animation programs, visit us at www.animschool.com


Friday, June 8, 2018

4 Quick Tips for a Better Idle Animation Cycle


    When creating idle animation cycles for games, there is more to keep in mind than just keeping the character moving. It is important to make sure that the animation is not only mechanically sound, but immersive enough to keep the player focused on the game. The key is to make the animation feel as natural and balanced as possible, while allowing for personality to show within the subtleties of the animation. Here are some good points to keep in mind:


  • Body Mechanics: The foundation of all animation. Make sure to have solid posing that accounts for any extra weight from armor or weapons.
  • Appeal: What is your character’s backstory, and how can you show your character’s personality through the animation? Even within an idle cycle, you can add appeal and contrast through posing, quirks, fidgets, etc.
  • Balance: That being said, it’s also important to keep your animation balanced and feeling natural. Too many fidgets or head turns can feel unnatural, so it could help to space them out so that they occur once every few breath cycles. With eye darts to the side, make sure to bring the gaze back to the other side and looking forward, so that it doesn’t feel like your character is focusing on one side.
  • Smooth Cycling: Even idle cycles contribute to a player’s immersion in a character and a game, so make sure that there aren’t any hitches in your cycles! You want to make it so that no one can tell when the animation loops back again. Make sure to check the tangents at the beginning and end of your animation to prevent any jitters.


In this clip from our Introduction to Game Animation class, instructor Jarrod Showers outlines the basic rubric of a good idle animation cycle, and shows his creative process from video reference to character animation.


Looking for the best 3D Animation schools? For more information about AnimSchool and our online animation programs, visit us at www.animschool.com

Monday, May 21, 2018

What Makes a Great Game Animator?


     Anyone who is interested in game animation may have wondered at some point how to prepare to be a game animator, and how game animation differs from feature film animation. Our Introduction to Game Animation instructor, Jarrod Showers, gave us some great insight on what it takes to be a great game animator.


Good Body Mechanics

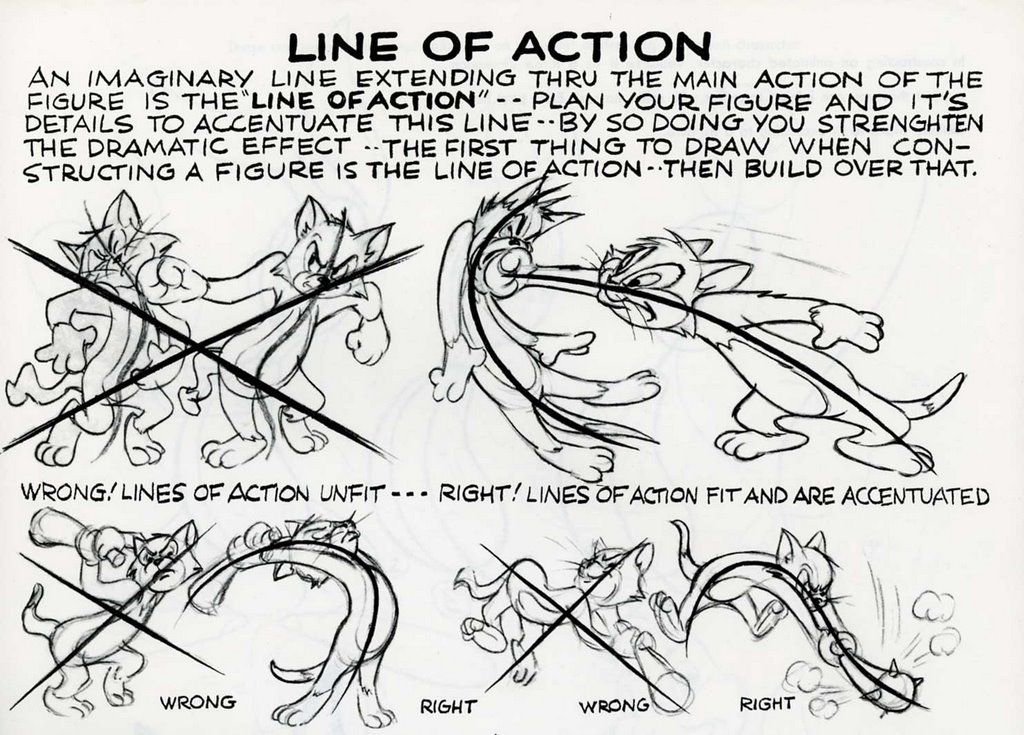
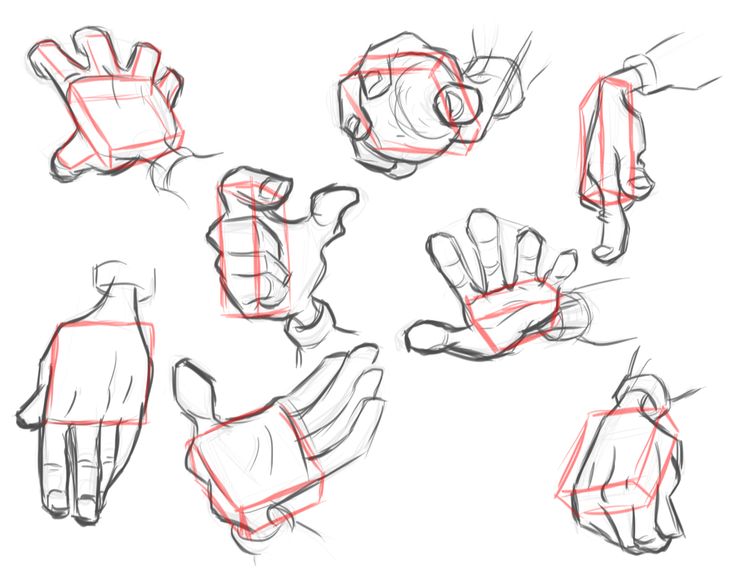
A good sense of body mechanics is a must for all types of animation, but it is especially important in game animation to be able to convey weight. Game animation has the potential to be viewed in 360 degrees, so the animator must be sure that their animation looks correct from all angles. This starts from having strong poses. Readability is key for game animations, so strong key poses are extremely important because they represent the action that is going to be performed. Game animations tend to hold a pose long enough to be read clearly, then transition quickly to the next pose.


   Enhanced timing is another key component of game animation. Games need to be fast and responsive, which carries over to animation - as soon as a player hits a button, the character reacts. This leaves very little time for anticipation, because getting to the main attack pose or the extreme of a jump in the air in a timely fashion is the highest priority. But, once that goal is achieved, animators are able to add anticipation and follow-through afterwards, so long as the animation is interruptible.


Be Technically Minded

Being a game animator isn't just about animating cycles! The games industry is a team-based industry where everyone relies on everyone to handle their part of the pipeline. Your involvement doesn’t end when you hit export out of Maya- it’s important to own your animation not only from the beginning, but also through implementation and iteration. You need to know the pipeline of the game engine you’re using, know how to implement constraints, troubleshoot problems that arise while exporting your animation, etc. so that there are less people you need to depend on. Because the industry is always changing and advancing, it’s very important to stay on top of the technology. At AnimSchool, we teach game animation students not only how to animate for games, but also how to implement their animation in the Unreal engine.


Being a game animator isn't just about animating cycles!


Be Efficient


    Game animators don't animate 100% of the time. As disappointing as that may be to some people, it’s really fulfilling to actually get MORE control over how your animations are being represented in the game. The industry is known for being fast paced due to tight deadlines, so it’s important to improve upon any part of the process to speed it up.  If you do something repetitively, can it be turned into a single click of a script? Always question if there is a better way, because others may not know your part of the pipeline as well as you do. Or, maybe someone else will have ideas for you!

Additionally, it is extremely helpful to be proactive. This is probably one of the best ways for a game animator to get noticed on the job. Because the game industry is very team based, if someone isn’t delivering progress in a timely manner, another area in the pipeline is being blocked - and it could easily snowball so that the entire production is being held back. It’s extremely important not to prevent anyone from doing their job.


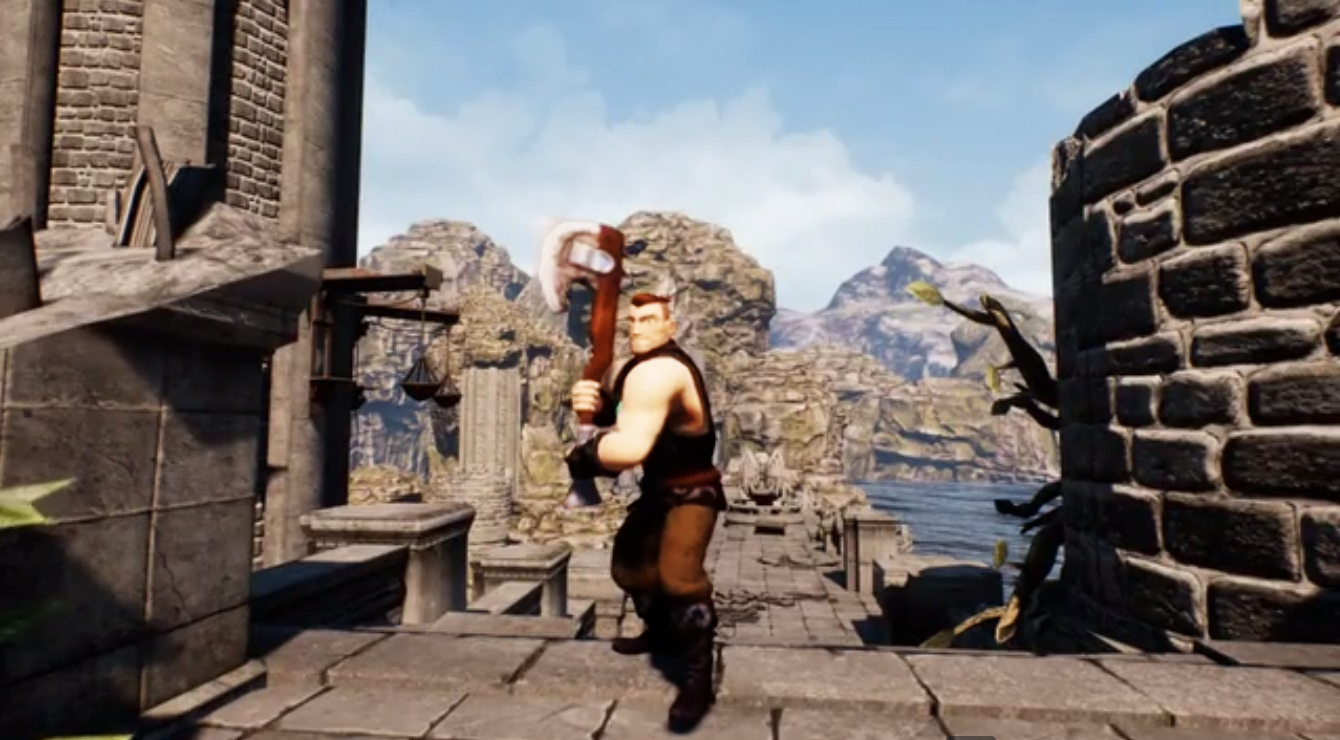
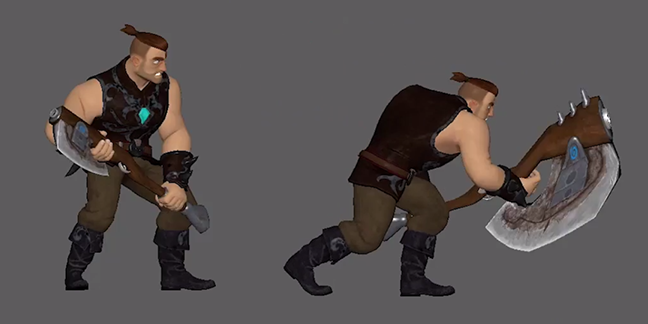
This means working out the timing and poses of an animation quickly, without polish, so that you can hand it off to a designer or programmer who needs it. It helps to work in big “brush strokes,” where you focus on the main body parts that are the most important for selling the animation, and to focus your time where it is most needed. Keep in mind what might be needed in the future when you begin to block out an animation. For example, if your character will be using a two-handed grip on his weapon for his attack animation, it would make transitioning easier later on if you forego the cool one-handed idle animation for a two-handed option that will flow better. Once your animation has been implemented, the iteration process begins, because seeing your animation in the game can be very different than what you may see in Maya.  Blend times between animations and move speeds can often have an unplanned-for effect on your animation’s overall presentation. Iteration is the key at this point, with polish coming after approvals are made to move forward.


In the event that you are blocked, or have finished your animation, it’s really helpful to start thinking about what task is coming next. Usually, a lead will have a few ideas in mind, and it’s always great to begin thinking about them early on so that planning can be done, i.e. thumbnails and video reference. The situation you always want to prevent is coming to your lead and surprising them by saying you have nothing to do.  In those moments, you should be prepared to offer up your own ideas, or already have plans for working on the next assignment. This can start even in school as students can look ahead to the syllabus. As in most learning situations, you will get out of it what you put in.


Be a Good Communicator


Have I mentioned that the games industry is team-based? Making a game is a collaborative effort with many dependencies, so having good communication skills are extremely important.  E-mail is a great way to keep track of information, but if questions don’t get resolved after a couple rounds, it’s often necessary to get up out of your chair and walk over to the person to hash things out. If you’re new to the industry or new to the job, it’s especially important to talk to your team and ask questions to ensure that you are all on the same page and prevent any misunderstandings that could lead to mistakes later on.


Love Games!

Last but not least, it helps to love playing games! Playing games and knowing the competition and trends is important for referencing to others when brainstorming. The games industry is always changing, from technology, to pipelines, to game trends. What is fun today, may not be fun tomorrow. I can’t even count how many times I’ve had my week all planned out on what I was going to accomplish, only to have to have priorities re-arranged because either an asset wasn’t ready, or the gameplay or story had changed significantly enough where I need to rethink how I’m going to approach an idea.


   It really helps the team if you can offer up good feedback based on your experience playing games, or even from testing out the game yourself. It will also help you become more creative, because you’ll have a better understanding of what will work and what won’t based on expectations of other game players. When being interviewed by a potential game studio, the one question that will almost ALWAYS come up is whether or not you play games and which ones are your favorites. In those moments you can stand out by staying current.
  

  Passion also plays a huge role. As a game animator, it’s important that you believe in the product you are making. A great animator is also a game developer who is passionate about driving the industry forward. Making the game should be as important, or more so, than being just a great animator. Basically, just love what you do and it will not only show in your work, but also make you a great addition to any team!


If you're interested in being a game animator, be sure to keep these points in mind, and don't forget to check out our Game Animation program!


Looking for the best 3D Animation schools? For more information about AnimSchool and our online animation programs, visit us at www.animschool.com