Thursday, February 25, 2021

Top 10 Tools and Plug-Ins Essential for Maya Animators


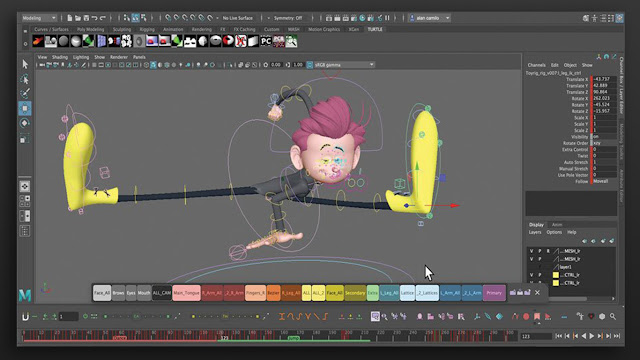
We can all agree Maya is quite a remarkable program. From creating particle simulations to modeling a character, Maya can do just about anything in CG. Maya was clearly built for a lot of different artists, but not for any one of them specifically. As a character animator, Maya can serve most of your needs, but the program wasn’t built for character animators specifically, so doing simple tasks such as checking arcs or creating parent constraints can get complex and time-consuming. Lucky for us though, artists around the world have created numerous plug-ins, scripts, and tools to help Maya animators out. Below we’ve compiled a list of some of our favorite tools that will help make Maya a happier place to animate and speed up your animation workflow. The best part: a majority of the tools we list are completely free to download today.


1. AnimBot | Subscriptions starting at $60/year (Free for current AnimSchool students)

First and foremost, the plug-in professional and student animators alike swear by: AnimBot. Tailored specifically for animators, AnimBot is filled with 150 tools that make animating faster and easier. Some of its notable tools include the tween machine, retiming tools and selection sets. It is an essential plug-in for any Maya animator and absolutely worth the cost. To keep animators from getting overwhelmed by the myriad of tools, there are pop-up gif tutorials built into AnimBot that make it quick and easy to find out what any of its 150 tools do.  

LEARN MORE


2. ZV Parent Master | Free

If you’ve ever felt lost in the world of Maya constraints - fret no longer! ZV Parent Master is a plug-in designed to make constraining objects simple and painless. With a few simple clicks, you can attach, detach and then reattach an object to a new object with ease. Retiming your attachments and detachments are as simple as shifting a couple keys, and for more complicated scenes, ZV Parent Master also has a colored timeline to visually show you what to and when an object is constrained. Currently offered for free, this tool is a must-have for animators.

LEARN MORE


3. bhGhost | Free

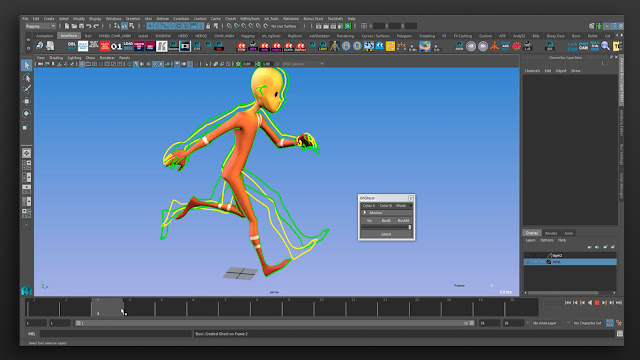
One thing many 3D animators forget is that despite the fancy 3D models that can be tumbled around freely in space, 3D animated shots are viewed on flat 2D screens. Ultimately, you are animating for the camera. In this way, classic 2D hand-drawn animation isn’t very different from 3D animation. With this in mind, tracking arcs and spacing on a 3D character can seem complicated compared to 2D drawings, where the spacing is obvious. bhGhost helps us bridge this gap by creating a way to transform your 3D model into a simple outline to help track spacing and timing. With this plug-in, you select your character's geometry, or whatever you want to track — whether it be a hand, a foot, or the entire character — and you ghost it. What sets bhGhost apart, is that it doesn’t simply onion skin your entire geometry. Instead, it creates an outline that reads as 2D to make it look like you're tracking a simple drawing instead of a complex, 3D rig. The plug-in allows you to change line thickness, color, and even add sphere trackers to the geometry to see parts of the body as a simple bouncing ball to track spacing. If you find that you have trouble tracking arcs and spacing with only your eye in Maya, bhGhost is definitely worth a download.

LEARN MORE


4. World Space 2 | $15

World Space 2 is a set of advanced animation tools for manipulating animation and switching between world, local, and parent spaces. First off, this tool is yet another way to constrain objects to each other. In this case, you put child objects into parent space and the tool will create temporary controls for you to animate with. Once you’re done, you can simply bake down the animation and have complete control over your character's original controls again. In addition, utilizing World Space 2 to put part of a character, such as an arm or head, into world space is a great way to do a final polish pass on animation since controlling how an arc will look to the camera in world space is much easier than in object space. In world space, you can fine-tune an arc by translating the head or limb more precisely. World Space 2 also includes a number of other features that allow you to create simple on-the-fly rigs for props, manipulate which channels you want space switching on, in addition to tools for creating paths and copying animation. 

LEARN MORE


5. AnimSchool Picker | Free

The AnimSchool Picker allows you to select and control components within Maya, just like the pickers they use at the big studios. With the AnimSchool Picker, animators can easily select rig controls without the clutter of NURBS curves controllers in the viewport. There’s ample opportunity to customize your picker from colors, names, sizes, and alignment. Navigating the picker is simple and allows users to zoom, pan, and click and drag to select multiple controls at once. In addition to controllers, the picker can be used to select geometry and other components in your scene.  Once you’ve created your custom picker, save it and reuse it for other characters by simply changing the namespace. The best part is that the AnimSchool Picker is free to anyone! I repeat you do NOT need to be an AnimSchool student to use this picker, however, students receive the perk of being able to use a number of pre-made AnimSchool Pickers included with their character rigs.

LEARN MORE


6. AnimPolish | Free (Basic Version)


Most professional studios have the luxury of a technical animation department. These are the people responsible for hair and cloth simulations, in addition to smoothing out any kinks when the rig needs to be pushed beyond its own boundaries in order to hit an extreme pose or make a point of contact feel like real flesh instead of crashing geometry. Unfortunately, as student animators working on personal projects at home, we don’t have this luxury. That’s where AnimPolish comes in. This plug-in offers a set of artist-friendly deformation tools to help add that extra polish and believability to their animation. With AnimPolish, you first export your animation so it is cast geometry. Then, using its tools, you can sculpt, adjust, and animate the geometry using a set of intuitive tools to fix any clothing clipping or crashing geometry, push poses for smear frames, or deform the skin in places where it comes into contact with other geometry. This is a great free tool if you're looking to bring your work to that next level of polish.


7. FCM_Hider | Free


We’ve all been there before. Awkwardly holding our hand up to our computer screen to block out the arms of a character so we can check if the body animation is working without being distracted by the other limbs. Or trying to add the rig's geo to a display layer but for some reason toggling the visibility button isn't doing anything. Well, there’s no need for that nonsense any longer! This tool gives animators a simple, quick way to hide parts of a character in order to focus on certain body parts. This is a great tool to ensure the body and root of the character are polished and moving properly without being distracted by the character's limbs. With FCM Hider, adding controls and geometry to a selection set is simple, and the easy-to-identify icons make turning parts of your character on and off a breeze. 


8. Convert Rotation Order | Free


Rotation order is something most student animators may not even know is an issue. You click E, the rotate gimble appears, then you click and drag that blue circle with the intention to rotate solely in the Z-axis, but when you check the channel box or the graph editor, you notice the X values changed as well. What’s happening? This is a small issue but becomes a problem when trying to polish rotations in the graph editor and the curves aren’t affecting the rig how you expect. You may also run into this issue after running the Euler filter to fix gimbal lock. This rotation order issue is further explained HERE. Unfortunately, you can’t simply switch rotation orders mid animation natively through Maya. However, animator Morgan Loomis has come up with a script to switch rotation orders while preserving animation. The ability to freely convert rotation orders with this plug-in will and allow you to polish curves in the graph editor with more accuracy. (If you’re still a bit lost and want to further understand this issue, AnimSchool instructor Justin Barrett explains Maya’s gimbal rotation HERE. Gimbal rotation, as opposed to object or world rotation space, is a more accurate representation of what rotation orders are.)


9. Studio Library | Free


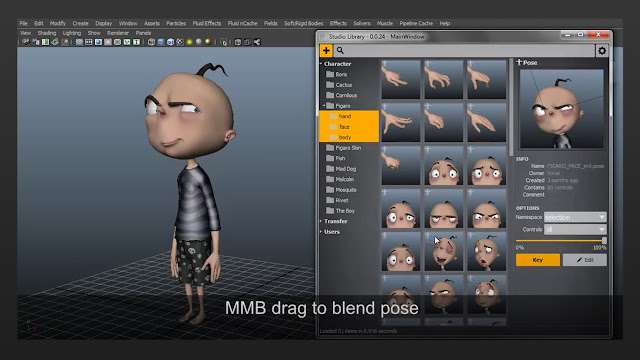
As the name implies, Studio Library allows animators to create a library of poses and animations. This tool makes reusing character poses, cycles, and lip-sync poses throughout a scene simple and helps speed up the process of blocking in poses. You can build upon and blend between different poses within your library to ensure your poses are still unique and not repetitive. Studio library also gives you the ability to create selection sets, mirror poses, and utilize shared pose libraries. If you’re looking to speed up your animation process and work with a pose library, Studio Library is definitely worth looking into.


10. Aaron Koresell Scripts | Free


Lastly, Aaron Koresell offers a collection of free scripts aimed at Maya animators that help fill in some of the gaps in Maya and improve your animation workflow. Created back in 2007, these tools are still very useful, however, a number of these are now available through AnimBot. Nonetheless, it is still worth giving his collection a look, especially since they are completely free, unlike AnimBot. To name a few, Koresell has scripts that will allow you to insert a key without changing animation curves, delete redundant keys to make the jump from stepped to spline more manageable, and toggle on and off image plane visibility. Since these are all Mel scripts, they can easily be made into buttons or hotkeys for easy access as well.


Tuesday, February 9, 2021

Maya Tools 101: Retime Your Shot


As an animator, learning how to retime your keys in a shot is an absolute must. If the character is moving too fast, you need to add frames. If the character is moving slow, you need to remove frames. Before you know it, you are retiming your keys left and right. There are various ways to retime your keys depending on the situation. 

Maya Timeline

The most common way of retiming keys is to use the default Maya timeline. 

Moving One Key

If you want to just move one key on your timeline, this is the easiest way to do it.
Left Mouse Button + Shift to select the key.
Left Mouse Button/Middle Mouse Button to move it.

Moving Multiple Keys

If there is a section of your shot that you want to move, you can select multiple keys together of that section to move those together.

Left Mouse Button + Shift to select the key.
Left Mouse Button/Middle Mouse Button to move it.

Make sure you are moving the keys by clicking on < >, anywhere else and it would deselect the keys.

Resizing The Keys

If there is a section of your shot that you think is overall taking a lot of frames, you can select that section and then resize it by making it shorter.
Left Mouse Button + Shift to select the key.
Left Mouse Button/Middle Mouse Button to move it.

However, this creates a problem of having keys midframe Like this.

Midframe keys create a lot of problems in animation and rendering so make sure your keys are exactly on frames like 12.0, not 12.34.
To deal with this issue, you have to snap your keys often manually.

Left Mouse Button to select the key.
Right Mouse Button to open the options menu.
Left Mouse Button on Snap.


Even after the snap, sometimes the keys have issues in graph editor with tangents so it is extremely important to use this one with caution.

Graph Editor

If you are an animator who uses graph editor a lot, selecting keys and moving those must have become part of your muscle memory by now. I for one am so used to moving keys in GE that I could not even recall how I was doing it. I had to do it slowly to make these gifs. 

Left Mouse Button + Drag to select keys.
Middle Mouse Button + Shift to move the keys.


The shift key helps you to move keys horizontally (0 degrees) and vertically (90 degrees) from the position of the key. You cannot move keys diagonally. This helps you to preserve the value of the keys that otherwise get changed and can cause a headache.


See! Values of the keys get changed. Better use Shift.

Dope Sheet

Not many animators use the dope sheet which is a shame because it is pretty dope (get it?). The dope sheet looks like this.


It shows all the keyed objects on the left side and their keys on the right side. It gives a very clear picture of the whole shot in terms of frames and makes it easy to move those without messing up any value or tangent arrangement of the keys.
Look at the following .gif! So neat...

Left Mouse Button on DopeSheet summary
Middle Mouse Button +Drag to move keys.

However, the dope thing is that you can move frames of one object on its own as well. Like this...


This is not all, you can move selected frames of objects you want, as well.

Left Mouse Button + Drag to select keys
Middle Mouse Button to move.


You should definitely try using the dope sheet more.

Mel Scripts

Here are the two most basic scripts for retiming keys:

timeSliderEditKeys addInbetween;

timeSliderEditKeys removeInbetween;

If you want to add more frames between your keys, this is the easiest way. 

Click the Left Mouse Button to add frames to your heart's content, but let's not go overboard alright? 


And the same goes for removing the frames from your timeline.

Happy Animating!

If you want to get started in Maya, check out our class Introduction to Maya at animschool.edu
Visit our Youtube channel for more animation tips. 


Join our online community with other 3D artists and animators in our online accredited courses. (ACCSC)
Apply today at animschool.edu